 Trust me when I say this – this is THE BEST home made paint. I’ve tried several for this blog, and this one came out the best. It does require a bit more effort, but I promise it’s worth it.
What I did was make this recipe, along side another non-cook recipe to see how it compared. The non-cook one is simply 1 cup flour, 1 cup water, 1 cup salt. Obviously, I didn’t make THAT much, so did a tablespoon of everything. Here’s the recipe for THE BEST ONE:
WHAT YOU NEED
1.5 TBSP sugar
1/4 TSP salt
1/4 CUP corn flour
1 CUP cold water
Food Colouring
DIRECTIONS
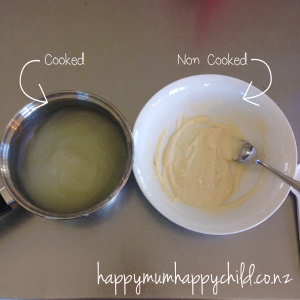
Add all ingredients into a sauce pan, and cook on the stove until it has thickened. Stir constantly. I found I needed a whisk to stir it, as when it comes closer to thickening, it becomes gloopy. What you should have is a clear-ish, smooth, gel, like substance. I have included a photo of what it looks like cooked. As soon as you see it thickening up, remove it from the heat and continue to stir – this should help to ensure it doesn’t become lumpy.
Next you have to let it cool down. Once cool (even warm is fine), split it out into bowls or jars, and add your food colouring.
COMPARISON
I found the cooked paint was much smoother in texture, and more like gel. The non-cooked paint was a tad lumpy, and more like the texture of icing. The colouring of the paint was interesting – the cooked paint took the colour EXTREMELY well and looked amazing. Whereas the non-cooked one, didn’t take very well. As the paint is originally a whitish colour (as opposed to the clear gel), it made the colours a pastel colour. Definitely go for the cooked one!!
PLEASE NOTE: This paint is not going to be as brilliantly bright and amazing as store-bought paint. It is meant to be used as a finger paint, but you can also use it with a paint brush. Don’t set your expectations too high haha 😛


