Category: Breakfast

Boiling An Egg


(c) Can Stock Photo / mythja


Boiling An Egg

Now boiling an egg, to eat, might not seem like rocket science but to some it is hard; and for me personally, I can never remember the times to cook the egg so that it’s perfect.

I have now been boiling eggs for at least 20 years (gees I’m old) and finally have perfected it.

So much so, that instead of poaching eggs for my breakfast, I use a soft-boiled egg and it’s amazing.

—————-

WHAT YOU’LL NEED:

  • A pot
  • Water
  • Eggs
  • A sharp knife

—————-

WHAT TO DO:

  1. 3/4 fill a pot with water (or at least with enough water to adequately cover the egg), and put on the stove on a high heat until boiling.
  2. In the meantime, take the egg, and at the larger of the ends (or as I like to call, the bottom of the egg), gently tap until you break through and make a small hole – this will ensure the egg doesn’t crack and the contents spill out when you’re boiling it.
  3. Once the pot of water is boiling, carefully add your eggs in (I use a spoon to lower them in).
  4. Continue to boil for as long as you want depending on how cooked you want the egg:
    1. 5 minutes for soft boiled (perfect as a poached egg substitute)
    2. 7 minutes for medium boiled
    3. 9 minutes for hard boiled
  5. Once the time has lapsed, remove the eggs from the heat and drain
  6. Immediately run under cold water to not only cool the egg down but also to stop it from cooking further
  7. Once it has cooled enough to touch, remove the egg from the pot and very gently tap on a hard surface to start breaking the shell
  8. Do this very very gently – you want to crack the shell as much as possible to make it easier to remove
  9. Then you can use your fingers to gently remove the shell – if you have a soft boiled egg then the egg will be VERY soft so you need to be extra careful.
  10. ENJOY!

—————-

SOME NOTES:

  • Initial egg temperature – An egg right out of the fridge will take longer to cook than an egg at room temperature.
  • Egg size – The bigger the egg, the longer it will take to cook. My eggs were around a size 7.

—————-

PIN ME:

————-

Baked French Toast


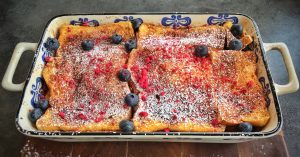
© Maria Foy | Happy Mum Happy Child


BAKED FRENCH TOAST

Sometimes I want to make French Toast (or sometimes called Eggy Bread) but can’t be bothered standing over a pan frying it on each side. So I’ve got the most amazing Baked French Toast recipe that you can make either the night before, or in the morning.

INGREDIENTS
2 Tbsp brown sugar
2 tsp cinnamon
5 eggs
1 1/2 cup milk
1 Tbsp vanilla
1/2 cup butter (melted)
1 cup brown sugar (firmly packed)
10-12 pieces of bread
Raisins (if desired)

DIRECTIONS
Preheat your oven to 180 degrees Celsius (if you’re making it that morning).
Grease a 20 x 30cm dish with butter.
Bowl 1: Combine the 2 tablespoons of brown sugar, and the 2 teaspoons of cinnamon, in a small bowl.
Bowl 2: In a larger bowl, combine the eggs, milk and vanilla.
Bowl 3: Combine the melted butter and 1 cup of brown sugar.
Spread the melted butter and brown sugar mix over the base of the baking dish.
Place slices of bread over this brown sugar spread and make sure the base is covered (you may have to cut the bread to make it all fit)
Pour 1/3 of your egg/milk mix over the bread, and then sprinkle the brown sugar / cinnamon mix on it.
Repeat for the next two layers – your final layer will have the last bit of the brown sugar / cinnamon mix.
NIGHT BEFORE: Cover with tin foil and place in the fridge until the next morning.
MORNING OF: Place baking dish (covered) into the oven and bake for 30 minutes. Remove the cover and bake for a further 10-15 minutes.

The baked french toast won’t be as crispy or crunchy as if you cooked it in the pan. It’s more like a bread and butter pudding (but without the butter). SOO DELICIOUS.

TOP with blueberries, icing sugar or anything you desire.

Note: in between each layer I sprinkled raisins. You can use this or blueberries, raspberries, any kind of berry. Just remember not to put the raisins / berries on the top when you’re baking it, because they might burn when you take the cover off the dish.

PIN ME:

Follow me on : SNAPCHAT  |  INSTAGRAM  |  TWITTER

——————

Perfecting The Pancake

perfecting-the-pancake
© CanStock

PERFECTING THE PANCAKE

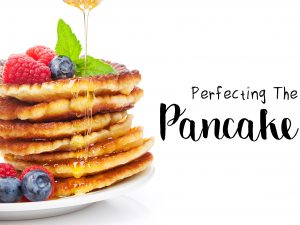
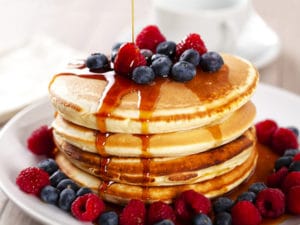
The plain ol’ pancake has always perplexed me. Which recipe should I use? Should it be fluffy or thin? What the heck is a crepe? How hot should I have the element? What about the pan?!!! Well have no fear, I am here to help …

Pancakes have been around hundreds of years; and according to Wikipedia, evidence suggests that pancakes are probably the earliest and most widespread cereal food eaten in prehistoric societies.

In Britain a pancake is often thin, is referred to as a “crepe” and has more eggs in it. In America, a rising agent is added to make it fluffy. Here in New Zealand (and in Australia!), small pancakes are known as ‘pikelets”.

Pancakes are often served with sweet toppings such as fruit, syrups, cream and lemon juice; and Crepes served with both sweet AND savoury toppings. If you haven’t tried a melted cheese and bacon filled Crepe, then you NEED TO!

This post is all about perfecting the pancake. Below are four tips and two recipes – all you need in one place!

———————-

Pin Me!
Basic Pancake RecipesPin Me!

———————-

1. Mixing The Batter

When you mix your batter together, one of the keys is to NOT over-mix it. If you see lumps in it, you might be tempted to keep mixing but DON’T EVEN THINK ABOUT IT!

As you mix the batter together, gluten starts to develop; so the more you mix the batter, the more the gluten continues to develop. What happens then is the batter can become overworked, and will result in tough chewy pancakes; instead of light fluffy ones.

For crepes – your batter will be MUCH thinner. Don’t stress though! This is because there is more liquid in it.

———————-

2. Resting The Batter

Once you’ve mixed your batter, it’s easy to want to pour that sucker out and start cooking. However you do need to be patient. Resting the batter might seem like an unnecessary step, but it’s a crucial one!

When you rest your batter, ideally from 5-30 minutes (depending on the recipe), it allows any activated gluten (from the mixing) to rest and relax. Meaning that the batter will get a thicker consistency, and ensure the pancake is fluffy and soft.

———————-

3. The Pan

In my person opinion, the pan is key to cooking the perfect pancake. You can add a million amazing ingredients, yet burn it in the pan and ruin it. I have used MANY pans over the years, and even tried a toasted-sandwich press to perfect it … so I feel I have enough experience to comment on this.

Recently I got sent the Sunbeam DuraCeramic , and began experimenting with it. I haven’t had much luck with ceramic pans in the past, so I’m not going to lie: I was extremely skeptical of this product.

However I believe I have put it through it’s paces. I have cooked pancakes, eggs, bacon, sausages and a whole range of other food items in here.

It heats up quickly, because it’s got it’s own element within it. The base is curved, making it super easy to flip pancakes, and from research can see that because it’s got a lid, can be converted to a small oven. So if you needed to cook anything extra, and oven space is limited, you can add it in here.

The Sunbeam DuraCeramic has a higher scratch resistant surface, and is four times more durable than non-stick coatings. The ceramic based coating is stain resistant and free from PTFE and PFOA chemicals.

One of the things in the past, with ceramic pans, is that I notice they start going black, and scratch easily. So far I haven’t come across this – which I am very pleased about.

To see the Sunbeam DuraCeramic in action, visit my YouTube channel and watch THIS VIDEO.

sunbeam-duracuramic-view-01

———————-

4. Cooking The Pancake

Cooking the pancake, in the right pan, definitely has an art to it. The temperature needs to be perfect. The pan surface has to be magical, and the wind needs to be blowing in the right direction.

Heat your pan up to a medium heat – if you heat the pan up too much, your pancakes will cook unevenly; and burn.

Once you’ve added a tablespoon (or more) of batter, let the pancake cook. You might be tempted to flip once the bubbles start to appear, however give it another minute.

For a crepe, the idea is to pour a small amount, and then tilt the pan to spread it out.

You should only need to flip the pancake once, during cooking (as long as you didn’t flip them too soon). If you flip pancakes too many times, it can cause them to deflate (if you want the fluffy ones!).

———————-

giveaway-logo-a sunbeam-duraceramic-giveaway

That’s right – I have a Sunbeam DuraCeramic (valued at $139.99) to give away to one of you! To be in to win, all you have to do is:

  1. COMMENT below telling me if you want it or not!
  2. LIKE Happy Mum Happy Child on Facebook

FOR EXTRA ENTRIES: Be sure to LIKE + COMMENT on this Facebook post (or the one that brought you here). Tagging friends (on each new line) will get you extra entries as well, but is not mandatory.

Giveaway open to NZers only. Normal T&C’s apply. Closes 9th December 2016.

Thanks so much to Sunbeam DuraCeramic for making this post possible, and restoring my faith in ceramic surfaces.

—————————

Blueberry & Chia Seed Jam

blueberry-chia-seed-jam
MARIA | HAPPY MUM HAPPY CHILD

Blueberry & Chia Seed Jam
NO COOKING REQUIRED

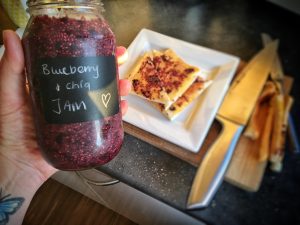
Sometimes we want to make our own jam – for whatever reason. Now I know not everyone has access to these types of ingredients, because yes they can be very expensive.

I learned about this recipe from Claire Deeks, of Dom’s Kitchen. If you do a Google search, you will find loads of different recipes out there. This particular recipe is a NO COOK recipe.

This also has just 3 ingredients in it, none of which is added sugar. The pectin in the blueberries is enough to help set the jam, and the chia seeds not only add texture but act as a type of gelatin.

Chia seeds are packed with omega-3 fatty acids, rich in fibre and protein; and they turn any liquid into a thick gel. Chia seeds will absorb several times their mass in liquid, creating a jelly-like substance in the process.

So although I’m using Blueberries for this jam, you could in fact use any type of berry and it would work because of the Chia Seeds.

————————-

INGREDIENTS:
2 cups fresh blueberries (or thawed frozen ones)
4 tablespoons black chia seeds
4 tablespoons maple syrup

DIRECTIONS:
Combine all ingredients in a food processor (I used our Nutri Ninja) and blitz for at least a minute until pureed
The chia seeds won’t get broken down, but that’s ok
Once all combined and pureed, pour into a jar and pop in the fridge
This will last at least a couple of weeks

————————-

You can try different berries too, but it’s worth remembering that each berry will have a different amount of pectin in it – and pectin is what helps the jam to set.

Alternatively, if you would rather buy your own Jam (because honestly it is cheaper), then just make sure you check out the ingredients on the back of the jar.

Chia seeds from the supermarket can be expensive – so shop around. The same goes for blueberries. Do a Google Search and see what it comes up with. You’d be surprised at the price difference!

Guys, interesting fact: did you know that legally in New Zealand, it can only be called “JAM” if it contains 65% sugar?! That’s crazy! So remember, if you’re looking for something a bit more natural, perhaps search for a “Preserve” or “Spread”.

PIN ME:

blueberry-chia-seed-jam-pinterest

————————-

A Guide To Cooking The Perfect Egg

A Guide To Cooking The Perfect Egg

a-guide-to-cooking-the-perfect-egg-title


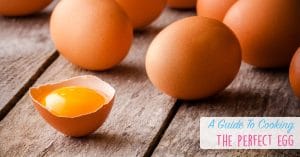
Eggs are an amazing way to start the day, for every member of the family (except the pet, of course).

Did you know that an egg contains 6 grams of protein? That’s quite a bit more than any other breakfast option, and as you know protein helps to sustain the energy through the day.

Eggs are also have at least 11 different vitamins and minerals as well Omega-3 and antioxidants. For more information about the nutrition of eggs, head over to the I Love Eggs website!

The New Zealand Nutrition Foundation notes that if you are generally in good health you can enjoy eggs as often as you like as part of a normal and healthy, balanced diet.

I often start my day with a couple of poached eggs on toast, and my kids do the boiled eggs with toast. As I said above, because Eggs pack a protein punch, they help my kids to stay full for longer – which ultimately gives them more energy during the day.

My 4 year old is at Kindy and is always on the go, and my son, who is 2.5 years old, is a never-ending ball of energy. So they really do need a good start every day.

However cooking eggs can be a pain, because I never seem to be able to cook the perfect one! So I have done a bit of research, and have put together this super helpful printout on how to cook the perfect egg:

Click to download and save to your computer …

a-guide-to-the-perfect-egg-a

——————————————-

>> G I V E A W A Y <<

countdown-gift-card

The folks over at I Love Eggs have graciously provided a $50 Countdown Card for one lucky person to get all of their breakfast needs to make the perfect eggs for the family …

  • LIKE Happy Mum Happy Child on Facebook
  • SHARE your favourite way to cook eggs
  • EXTRA ENTRIES can be obtained by liking / commenting back on THIS FACEBOOK POST
  • Would love you to tag all of your friends, and share the post – however it is not mandatory
  • All comments will be counted as extra entries

Closes 2nd October 2016. Open to NZ residents only – sorry everyone else! Normal T&C’s apply.

Thank you so much to I Love Eggs for making this post possible.

———————-

Breakfast Ideas For Kids

Breakfast Ideas for Kids Link
© Maria Foy | Happy Mum Happy Child


Breakfast Ideas For Kids

Thinking of things to give your kid for breakfast can be difficult, on a good day they ask for cereal and then spit tacks when it’s the wrong type. On a bad day, you actually put effort in and they turn their noses up – because kids don’t give a shit about the effort you put in.

As such I’ve put this list together of a whole raft of things, including the traditional items.  For the mundane, cereal-type stuff, check out the World’s Easiest Kid Breakfasts post.

——————-

Breakfast Bears Instagram
Breakfast Bears

——————-

Crepes 03

Crepes

——————-

French Toast Roll Ups 01

French Toast Roll Ups

——————-

Baked French Toast

——————-

3 In Gredient Pancakes No Flour No Egg
Three Ingredient Pancakes – No Flour & No Eggs Version

——————-

Three Ingredient Pancakes Flour

Three Ingredient Pancakes – Flour & Egg Version

——————-

Pan Fried Cinnamon Bananas Link

Pan Fried Cinnamon Bananas

——————-

Breakfast Bananas Link

Breakfast Bananas

——————-

The World's Easiest Kid Breakfasts

Regular Breakfast Ideas

——————-

The Regular Breakfast Ideas one above is just your usual cereal, eggs, toast, etc etc … Don’t forget about smoothies too!  However if you’re looking for more ideas, be sure to check out my Breakfast Ideas For Kids board on Pinterest.

Be sure to follow me on Instagram and Snapchat as I usually post everything I do there.

Hope this was useful in your quest for finding breakfast ideas for your kids!

——————

The World’s Easiest Kid Breakfasts


YOU HEARD IT HERE FIRST!

The World’s Easiest Kid Breakfasts

The World's Easiest Kid Breakfasts


Who knew parenting would prove to be so “interesting”!?  We all have these pressures we put on ourselves – whether they’re real or not is up to us to decide.

Whilst I might make pancakes for breakfast a few days out of the week, it doesn’t make me any better of a parent than someone who serves toast. It also doesn’t make the toast-serving-parent lazy – it actually makes them smart ????

There are also a lot of recipes out there for the most amazing breakfasts – heck I’ve got some of them on my page!  3 Ingredient Pancakes, French Toast Roll Ups, and more.

However, what about “recipes” for the easiest breakfasts?  Technically this isn’t a recipe, it’s a compilation, but I don’t care.  So here are the World’s Easiest Kid Breakfasts:

  • Toast
  • Eggs
  • Cereal
  • Yoghurt
  • Fruit
  • Rolled Oats

There you have it – the World’s Easiest Kid Breakfasts.  As they say in life – keep it simple!

Half the time when I make my kids cooked breakfasts, they don’t eat it.  So why bother putting the effort in HAHA!

What’s the easiest breakfast for your kids?


Crepes

Crepes 03
© Maria | Happy Mum Happy Child

CREPES!

A Crepe is a very thin pancake, so no baking powder needed.  Growing up, this is what we would have for dessert on special occasions.  My Dad would cook crepes – so this is definitely a memory-dish for me.

This particular recipe is super simple and surprisingly easy – just throw everything into a bowl or blender, mix, chill and then cook!

You can make this gluten free by using Gluten Free flour (I use Edmonds Gluten Free Flour) instead of regular flour.

INGREDIENTS:
1½ cups milk
4 large eggs (size 7)
1 cup flour (regular or gluten free)
3 tablespoons butter / margarine
1/4 teaspoon salt
2 tablespoons sugar

DIRECTIONS:
Add all ingredients into a blender or large bowl, and process / beat until combined and foamy.  The batter will be runny – not like your normal pancake mix.

Transfer to the fridge and chill for 30 minutes.  During this time, you can prepare the rest of your toppings – whipped cream, jam, lemon juice, sugar, fresh fruit … you can add whatever you want to crepes!  My personal favourite is nutella and whipped cream … OMG ????

Once the 30 minutes is up, heat a slightly buttered pan and cook your crepes.  The idea is that you pour a small amount, and then tilt the pan to spread it out.  It should only take 30-60 seconds each side.

Once each crepe is cooked, transfer to a plate and store in a warmed oven until all crepes are done.

You can eat your crepes with savoury or sweet toppings.

ENJOY!

————————–

3 Ingredient Pancakes – Allergy Friendly


3 INGREDIENT PANCAKES – ALLERGY FRIENDLY

3 Ingredient Pancakes

——————————–

This recipe for pancakes has only 3 ingredients and is actually quite amazing.  Completely 100% from the amazing Lydia Bakes and her snapchat.  No eggs and no flour means this is a great allergy-friendly recipe. Lydia’s original recipe had Almond Milk in it – so you can use any type of milk that suits your needs.

INGREDIENTS:
1/2 cup Rolled Oats
1 Banana
4 TBS Milk
OPTIONAL: pinch of cinnamon

DIRECTIONS:
Put all ingredients into a blender and blitz.  I used our NutriBullet.  If you have a stick blender, I’m sure that will help.  The pancake batter shouldn’t be too runny – add some more rolled oats and re-blitz if the consistency doesn’t feel right.

Cook as you would a normal pancake, and enjoy with your favourite toppings ????

—————————

3 Ingredient Pancakes


3 Ingredient Pancakes

This is going to be short and sweet. Only three ingredients to this pancake recipe.

INGREDIENTS
1 cup self raising flour
1 cup milk
1 Egg
Optional: food colouring

WHAT TO DO
Combine ingredients. If you want you can let the mixture rest in the fridge, or you can cook straight away. Fry them up in a frying pan. OR you can cook them in a sandwich press – which is how I cook them. The heat is always perfect and I don’t need any oil or butter to cook it in.

ALTERNATIVES

  • Put the mixture into a lined round baking tin, and bake in the oven (180 degrees) for 15 minutes. Produces a cake, which you can then slice up and eat.
  • You can use a cookie cutter to cut out shapes in the pancakes

Serve with your favourite toppings and lots of fruit…OM NOM NOM

PIN ME:


—————–


%d bloggers like this: